On the way up to Cascade Springs, these are a few of the things we heard in the van.
Nichole (speaking of the forest we were driving through): And it has more carnivorous trees.
Daddy: Oh, no. I'm not getting out of the car.
Nichole: I mean coniferous.
Nichole: Once Dad made a squirrel scream.
Jr.: Once he made an enderman scream, too. But not in the same way.
Showing posts with label KAT's Kreation. Show all posts
Showing posts with label KAT's Kreation. Show all posts
Friday, July 3, 2015
Monday, April 28, 2014
KAT's Kreation
Often heard in our home: "Is the dishwasher clean or dirty?" The answer sometimes comes quickly and sometimes it takes a bit to remember. "Has the dishwasher been run yet?" or "Have the dishes been put away yet?"
Enter a simple solution- the Dirty/Clean sign.
I cut two small pieces of cardstock of differing colors and glued them back to back. On one side I wrote CLEAN. On the other I wrote DIRTY. I laminated the sign with clear con-tact paper. I left enough room where the words weren't to put poster tack on each side to stick it to the dishwasher.


Simple. If the dishwasher is empty or has dirty dishes in it, the DIRTY side is displayed. As soon as it is filled and turned on, we flip the sign over to the CLEAN side. As soon as it has been emptied we flip the sign to the DIRTY side again.
My 3-year old loves to look at the sign and point out if it's clean or dirty. He can recognize which color represents "dirty" and which color represents "clean."
Sunday, October 6, 2013
KAT's Kreation
Jr. has a pair of pants that he really likes but he tends to get holes in the knee. Then he tends to stick his fingers in the holes and make them worse. I've tried to just stitch them up but that only lasts so long before the holes come back and he's sticking his fingers in them again. Finally I was looking at a friend's blog one day and saw that she put patches on her sons' pants when they wore out the knees. I'd never really done that before, but figured I could try it.
Jr. calls this particular pair of pants his "Batman pants" since he got them with some other Batman-themed items one time. So of course I needed to put a Batman-themed patch on them. I couldn't find any fabric I liked at the store (we have plenty of scrap fabric at home) so I finally decided I could be creative... with Jeremy's help.
He drew out the shape I wanted on black fabric. I cut it out along with a yellow oval and a black oval to cover the hole on the inside of the pants.
Then it was simply applying iron-on adhesive to stick the black symbol and yellow oval together. I stitched around the outside of the black symbol so it wouldn't fray. I applied the yellow oval and the black oval to either side of the hole with the iron-on adhesive and again stitched around their edges to keep them from fraying.
 Something I learned: Next time I need to make sure the fabric on the outside and the fabric on the inside match up better. After stitching up the outside oval I realized that if I poked the needle through from the back to the front, I would have these random stitches in the middle of my yellow. I was able to adapt and managed to get the needle through so it didn't go all the way through the yellow part, but just the pants part. And it didn't have to look as pretty on the inside, just keep the inside patch from coming off (I wasn't using the heavy duty iron-on adhesive), so I only had to make a few stitches here and there.
It turned out and Jr. was happy with the result.

Jr. calls this particular pair of pants his "Batman pants" since he got them with some other Batman-themed items one time. So of course I needed to put a Batman-themed patch on them. I couldn't find any fabric I liked at the store (we have plenty of scrap fabric at home) so I finally decided I could be creative... with Jeremy's help.
He drew out the shape I wanted on black fabric. I cut it out along with a yellow oval and a black oval to cover the hole on the inside of the pants.
Then it was simply applying iron-on adhesive to stick the black symbol and yellow oval together. I stitched around the outside of the black symbol so it wouldn't fray. I applied the yellow oval and the black oval to either side of the hole with the iron-on adhesive and again stitched around their edges to keep them from fraying.

It turned out and Jr. was happy with the result.

Now my little boy can keep being a little boy and hard on the knees of his pants.
Thursday, August 1, 2013
KAT's Kreation- gecko earrings
Years ago, I made a lot of beaded jewelry- bracelets, earrings, etc. As you can imagine, with little kids, I don't do nearly as much with those tiny beads now.
One of my favorite pairs of earrings I made was a pair of geckos that I still wear often.

For Nichole's birthday this year, I wanted to make her a pair of gecko earrings in colors she liked. Since she doesn't have pierced ears, I found some clip-on earring attachments at a Jo-Ann store so she could wear them on her ears like me.

She was very happy with the result Unfortunately, her ears are not used to having things clipped on them, so she can't wear them for very long at a time. She does like them, though and I'm happy for that.

Tuesday, November 22, 2011
KAT's Kreation
Have I mentioned? Last Summer I was released as a Sunbeam teacher and called as the Primary chorister. And even though I've been in Primary for almost two years now, I had never participated in the Primary Program in our ward. I was called to Primary after the program two years ago.
Last year, I barely missed it because Jr. Jr. came along a few days before. Thank goodness for people who volunteered to step in and help with the Sunbeams during the program in case I couldn't be there.
This year, I did get to be a part of the Primary Program. I was able to help the children share their testimonies through music, and they did sooooo well. I thought the whole program went well.
And since the Primary children did so well and had worked so hard learning those songs, practicing week after week to get ready for the program, I thought it would be a nice break for them to have a week of just fun.
No practicing program songs, just singing fun songs, some that had their own actions and some that we could do special things with.
One of the sisters I visit teach suggested making a turkey with feathers that had songs listed on them, so that's what I did (once again, the benefits of home and visiting teaching).

Scissors + construction paper + paper plates + glue + crayon + sharpie + pencil + tape = Fun for Primary kids.
They did have fun. The orange feathers had fun Primary songs listed on them. If the song had it's own actions (like Popcorn Popping or Once There Was a Snowman), we did those. If they didn't have their own, a child would pick a yellow feather which had instructions on it, such as turn around every time you sing a certain word (you should have seen us on Give Said the Little Stream turning around every time we sang the word "Give." Do you realize how many "Gives" there are close together in that song?)
The feathers were just taped on so I was able to stick them back on between Senior and Junior Primary's sharing times.
I'm glad it turned out like it did.
Now to get to work on Christmas songs.
Saturday, July 16, 2011
KAT's Kreation- Flower Clips
Nichole has been asking for flower clips for her hair for months and months, ever since a friend gave her one. I finally got around to making some for her birthday. They were really easy, once I finally found the supplies I was looking for. And they took less time to make than it took me to write this blog post.

This is what I did.
Supplies:

Hair clips with openings in at least the top
Silk flowers (I got an assortment from doodlebug design inc. at the craft store)
Brads, a.k.a. paper fasteners
Instructions:
Make a hole in the middle of a silk flower. Stick the brad through the hole. Stick the brad through the opening in the hair clip and open the brad.
Note: I used regular paper fasteners that you find at an office supply store. Unfortunately I couldn't find shorter than 1-inch at the store, so that's what I went with. I figure I can use them for plenty of other projects. You can use fancier brads from the craft store if you wish.

It worked out and Nichole was pleased.


Supplies:

Silk flowers (I got an assortment from doodlebug design inc. at the craft store)
Brads, a.k.a. paper fasteners
Instructions:
Make a hole in the middle of a silk flower. Stick the brad through the hole. Stick the brad through the opening in the hair clip and open the brad.
Note: I used regular paper fasteners that you find at an office supply store. Unfortunately I couldn't find shorter than 1-inch at the store, so that's what I went with. I figure I can use them for plenty of other projects. You can use fancier brads from the craft store if you wish.

Since my paper fasteners were so long, I wrapped each side around the top of the clip but under the flower.


Friday, July 1, 2011
KAT's Kreation- Journal
I've got a journal (and a blog), Nichole's got a journal, Jeremy's got a personal/family history blog, Jr. Jr. would just chew on a journal if he had one, but Jr. was missing out.
So guess what we did. We made him a journal.

Looking at other journals and most books, they are stitched on the inside, so that's what we did. I folded over a bunch of 8 1/2 x 11 inch computer/printer paper, used a safety pin to make a bunch of holes through the fold, then did backstitching with heavy thread all the way down.

I made sure the ends of the thread were on the outside and we covered the spine with duct tape. Everyone loves duct tape.

Nichole added a little cover art and Ta-Da, we had Jr.'s first journal.

And it didn't even take very much time. Hurray!
So guess what we did. We made him a journal.


I made sure the ends of the thread were on the outside and we covered the spine with duct tape. Everyone loves duct tape.


Monday, April 25, 2011
KAT's Kreation- Oho
It's been so many years but the other day I felt like making an oho, so I did.
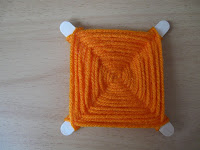

I plan to teach the kids how to make them as they are a simple craft. That may be a blog post for another time.
What simple crafts have you done lately?


What simple crafts have you done lately?
Subscribe to:
Posts (Atom)